After successful installation of OBS and all other installation steps, the
following provides basic information needed to use the hams.live system
BASIC ELEMENTS LAYOUT IN OBS
NOTE: This is only an example of an OBS layout. All elements can be relocated or if
desired, detached from OBS and operate independently on available screen space. Also OBS supports Projector windows
where the Canvas or other elements can be placed in a window and located as desired.
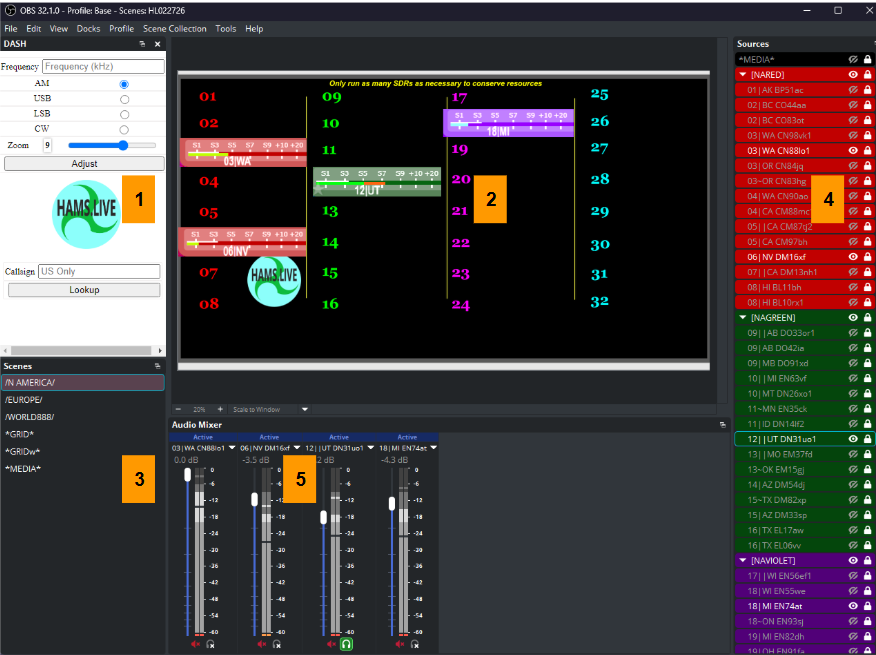
1 hams.live DASHboard
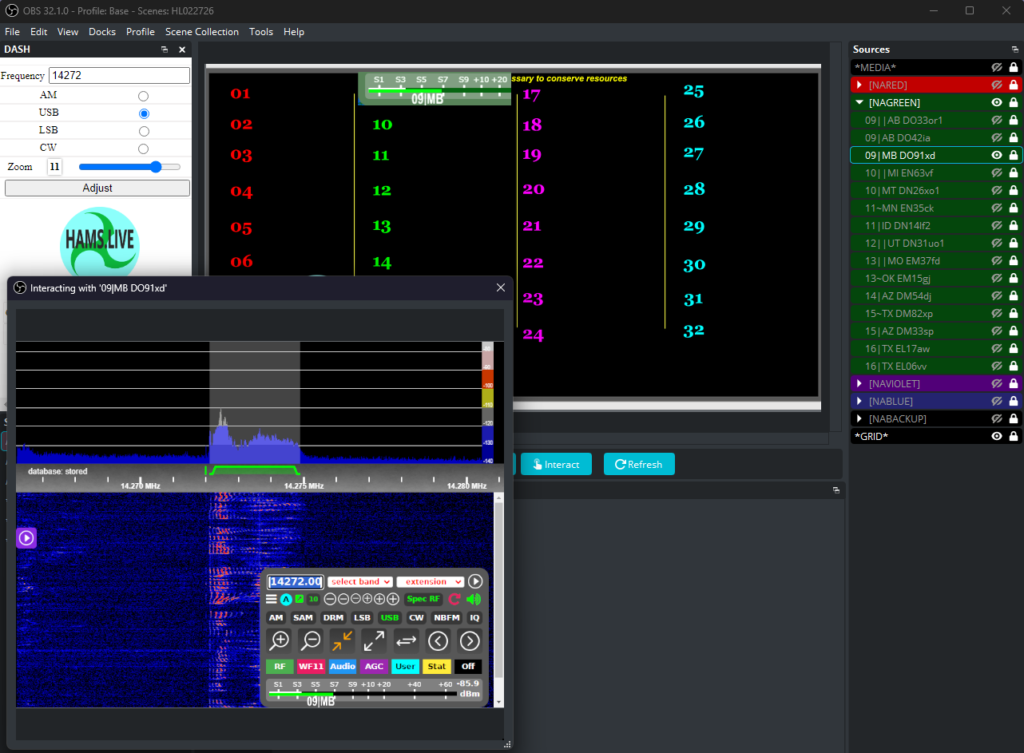
The DASHboard controls basic SDR parameters. In the Frequency field, type desired frequency IN KILOHERTZ with no spaces. Select the desired mode by clicking a radio button next to AM, USB, or LSB. If desired, adjust the SDR waterfall zoom level. Then, click the ADJUST button. There will be no visual indication, but after doing this all SDRs loaded into an OBS Scene Collection will be updated with this information. After activating one or more SDRs, changing any of the DASHboard parameters and clicking ADJUST will cause the SDR(s) to refresh with new parameters.
2 Canvas
The Canvas area in OBS is where visual rendering of SDRs will be displayed. As each SDR is activated, the S-meter portion will be shown. SDRs are color coded, matching colors shown in the SDR Sources List. These colors represent the relative position where SDRs are displayed in the Canvas within each Source Group. Right-clicking in the Canvas area will bring up a menu where options can be invoked to turn off the Canvas (uncheck Enable Preview) and alternatively display the Canvas in a separate window ( Windowed Projector Preview).
For those wishing to develop their own custom Scenes, OBS also allows for Source content in the Canvas to be moved and re-sized. This can be done by unlocking the Source (padlock icon shown to the far right in SDR Sources List). If the Source is in a Group, then the Group padlock would also need to to be unlocked. After this, when the Source is selected, bars will appear around the display in the Canvas which can be manipulated using the mouse.
3 Scenes List
The Scenes List controls which set of SDRs within a selected OBS Scene Collection are loaded into the SDR Sources List. The Scene name describes what purpose that the Scene provides (e.g., CONTINENT for wide coverage across a continent, REGIONAL for local coverage). Select a Scene based on what geographic assortment of SDRs is desired. Users can also create their own custom Scenes in a Scene Collection by selecting which SDRs are desired.
4 SDR Sources List The SDR Sources List is the place where SDRs loaded from a Scene in an OBS Scene Collection are listed. Each SDR is sorted in the list alphabetically by Grid Square. SDRs are usually shown under a Group with each name indented. SDRs can be launched using the activate button to the right of each SDR name. Activated SDRs under a Group will not activate unless the group activate button to the right of the Group name is also activated. This allows for several SDRs within a Group to easily be toggled on/off or refreshed with a single click. Within each Group, SDRs are color coded matching their S-meter and corresponding to where they display on the Canvas. In order to avoid display overlap, only one SDR with a given color code under each Group should be launched at a time. See Sources Legend below.
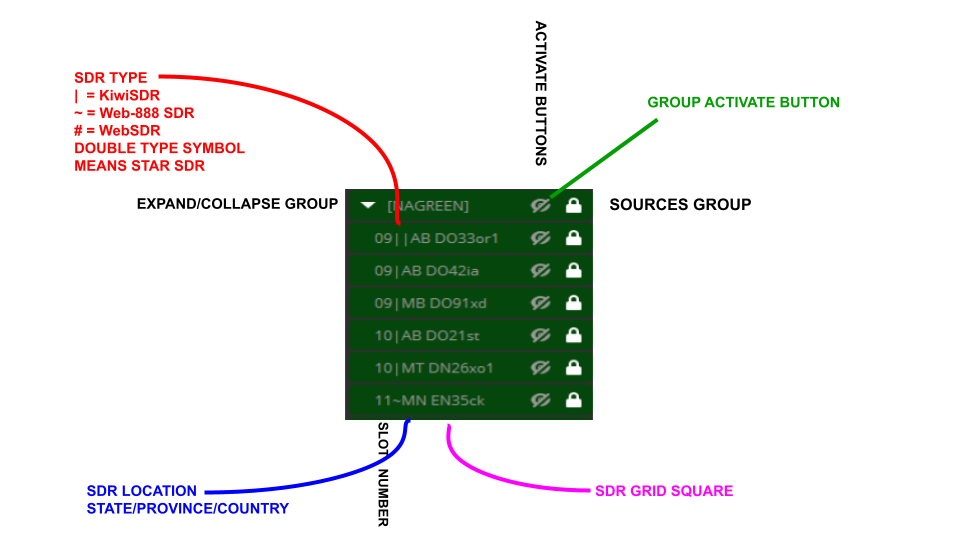
SOURCES LEGEND
Click HERE to learn what to do if an SDR Source does not activate.
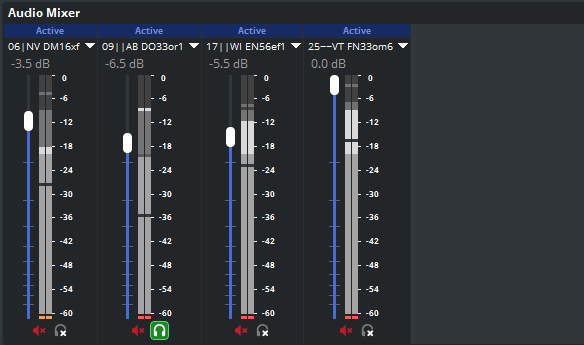
5 Audio Mixer
The Audio Mixer is where audio for activated SDRs can be controlled. As one or more SDRs are activated in the SDR Sources List, a slider control for each one will appear in the Audio Mixer along with the SDR name. SDR slider controls will be displayed in alphabetical order. Each slider control has two buttons. The red button is for streaming in OBS and is no longer used for hams.live. The other button looks like headphones, and this is the Monitor button controlling audio monitoring. When an SDR activates it should come up muted by default. Pressing the Monitor button should unmute audio for that Source and the Monitor button will turn green. If an SDR is unmuted and then de-activated in the SDR Sources List, OBS will remember the last state that the mute toggle was left in. When un-muting an SDR, sound from the SDR should be heard coming from your default OBS monitoring device (OBS main menu/File/Settings/Audio/Advanced/Monitoring Device).