Install theGateway
A step-by-step setup guide — no technical background required. It takes about 15–20 minutes the first time.
Before you start, make sure you have:
- A Windows, Mac, or Linux computer
- An internet connection
Mac & Linux users — please read this first
theGateway works on Windows, Mac, and Linux, and OBS Studio itself behaves almost identically on all three. Wherever a step differs by system, you’ll see it broken out under 🪟 Windows, 🍎 Mac, or 🐧 Linux — just follow the one that matches your computer. The Windows steps are fully tested. The Mac and Linux steps are new and written from how these systems normally work, but haven’t yet been confirmed on real hardware — if anything doesn’t match what you see on screen, please let us know so we can fix it for the next person.
STEP 1
Download and Install OBS Studio
OBS Studio (Open Broadcaster Software, aka, OBS) is a free, open-source program normally used for video streaming and recording. theGateway uses it a little differently: OBS has embedded web browsers that can display content from live SDR (Software Defined Radio) sites right inside its Canvas window. OBS is the “engine” that theGateway dashboard controls. You won’t need to know anything about video streaming to use it.
🪟 Windows
1a. Download the installer
- Go to https://obsproject.com/download
- Click the Windows logo
- Click the Download Installer button
- Once the download finishes, open the file (it will be named something like OBS-Studio-XX.X.X-Windows-Installer.exe) from your Downloads folder or browser download bar
🍎 Mac
1a. Download and install
- Go to https://obsproject.com/download
- Click the macOS logo
- Click the Download Installer button
- Open the downloaded .dmg file, then drag the OBS icon into your Applications folder
- Open OBS from your Applications folder (or Launchpad)
You may see a message saying OBS “cannot be opened because it is from an unidentified developer.” This is a routine Mac security check, not a problem with OBS. Go to System Settings → Privacy & Security, scroll down to the security message near the bottom, and click Open Anyway — then confirm by clicking Open in the popup that follows.
1b. Install OBS
The installer will walk you through a few screens. Unless you have a specific reason to change something, click Next on each screen and use the default options, then click Install. When it finishes, leave the box checked that says Launch OBS Studio and click Finish.
If a Windows Defender Firewall box pops up asking whether to allow OBS Studio network access, click Allow access. This lets OBS and theGateway’s dashboard talk to each other on your own computer — nothing goes out over the internet.
First time opening OBS
The very first time OBS opens, it may offer to run an “Auto-Configuration Wizard” to optimize settings for streaming/recording. theGateway doesn’t need this — click Cancel (or close the window) if it appears.
🪟 Windows users: that’s everything you need for this step — skip the Mac and Linux sections below.
.Continue to Step 2 →
🐧 Linux
1a. Install OBS Studio
The simplest option that works the same way across nearly every Linux distribution is Flatpak, which OBS officially supports. Open a terminal and run:
flatpak install flathub com.obsproject.Studio
On Ubuntu or Debian
As an alternative to Flatpak, you can use OBS’s official PPA:
sudo add-apt-repository ppa:obsproject/obs-studio
sudo apt update && sudo apt install obs-studio
STEP 2
Configure WebSocket Server
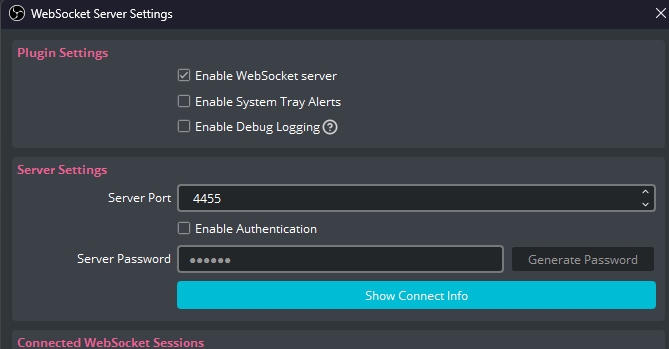
This step lets theGateway’s dashboard “plug into” OBS and control it — turning radio sources on and off, adjusting frequencies, and so on. Without this connection, the dashboard has nothing to talk to.
- In OBS, click Tools in the top menu
- Select WebSocket Server Settings
- Match settings exactly as shown below, then click Apply and OK:
| Setting | Value |
|---|---|
| Enable WebSocket server | Checked ✔ |
| Enable System Tray Alerts | Unchecked |
| Enable Debug Logging | Unchecked |
| Server Port | 4455 |
| Enable Authentication | NOT checked |
Why no password?
This connection only ever travels between two programs on your computer — it never reaches the internet — so a password isn’t needed. Leaving authentication off also prevents common connection problems.
STEP 3
Turn Off Browser Hardware Acceleration
Content from many live SDR sources can be displayed on the OBS Canvas at the same time — each one is an embedded web browser Source running inside OBS. Hardware acceleration tries to offload video decoding to your graphics card, but with many browser sources running together, this frequently causes them to freeze, flicker, or go black. Turning it off keeps every source running smoothly.
- 🪟 Windows / 🐧 Linux: click File in the top OBS menu, then Settings. 🍎 Mac: click OBS Studio in the top menu bar, then Settings
- Click Advanced on the left
- Scroll down to the Sources section
- Make sure Enable Browser Source Hardware Acceleration is unchecked
- Click Apply, then OK
STEP 4
OBS Cleanup
There are two ways to use theGateway: with its dashboard docked right inside the main OBS window alongside the Canvas (the simplest setup, and the one these instructions walk through), or with the Canvas popped out into its own separate Projector window while OBS runs quietly in the background — handy if you have more screen space. We’ll cover that second option in more detail separately; this will set up a simple, all-in-one-window version.
A fresh install of OBS comes with several panels open by default — Scenes, Sources, Audio Mixer, Scene Transitions, and Controls. None of these are needed for viewing since theGateway controls all functions, so turning them off now to keep things clean before we add theGateway itself later.
- In OBS, click Docks in the top menu
- You’ll see a list of panels with checkmarks next to the ones currently showing. Click each of these to turn it off: Scenes, Sources, Audio Mixer, Scene Transitions, and Controls (the exact set may vary slightly depending on your OBS version — turn off whatever is checked). Your OBS window should now show just the empty Canvas area, with no other panels cluttering the edges. That’s exactly what we want — Step 8 adds theGateway itself as the one interface to use. Turning off OBS panels just hides that panel — it doesn’t remove anything. If you ever want Scenes, Sources, or any of the other Panels back (maybe for troubleshooting), just revisit the Docks menu and check again.
- In the top OBS menu, click File, then Settings, then select Video. Under General, change the Base (Canvas) Resolution and Output (Scaled) Resolution values to 3840×2160 by manually typing in the new values . Then, click Apply and OK. Re-starting OBS will be necessary to apply the values.
STEP 5
Create obsfiles Folder
theGateway needs a few small files stored on your computer to run. The software is designed to look for certain files in this specific location. Keeping all files in one place also facilitates updating to new versions.
🪟 Windows
- Open File Explorer
- Go to your C: drive (usually called “Local Disk (C:)” in the sidebar)
- Right-click an empty area, choose New → Folder
- Name the new folder exactly: obsfiles
Your folder path should now be C:\obsfiles
🪟 Windows users: that’s everything you need for this step — skip the Mac and Linux sections below.
.Continue to Step 6 →
🍎 Mac
We use /Users/Shared/obsfiles on Mac — the Shared folder because, like C:\ on Windows, it’s the same for every user account on the computer and doesn’t need an administrator password to write to.
- Open Finder
- Press Cmd+Shift+G to open “Go to Folder”
- Type /Users/Shared and press Return
- Right-click an empty area in that window, choose New Folder
- Name the new folder exactly: obsfiles
Your folder path should now be /Users/Shared/obsfiles.
🐧 Linux
We use /opt/obsfiles on Linux — /opt is the standard location for add-on application data on virtually every distribution, and using it (rather than a folder tied to your username) means the same download works for anyone. This needs one one-time terminal command to create the folder and hand you ownership of it:
sudo mkdir -p /opt/obsfiles && sudo chown $USER:$USER /opt/obsfiles
You’ll be asked for your password (this is your normal login password — typing it won’t show any characters on screen, that’s normal). After this, /opt/obsfiles is a regular folder you can open, and add files to, from your file manager like any other.
STEP 6
Download theGateway Files
- Visit the theGateway Files page on this site
- Download the latest OBS Scene Collection .JSON file for your operating system (🪟 Windows, 🍎 Mac, or 🐧 Linux — make sure you pick the right one, they are not interchangeable)
- Download the latest theGateway dashboard file (named something like theGatewayXX.html, where XX is a version number)
- Download a hamsoverlay file (named something like hamsoverlayXX.html, version number for this should match the version number for file downloaded in #3 above)
- Download all image files listed
- Move all of these files into your obsfiles folder from Step 5:
🪟 C:\obsfiles 🍎 /Users/Shared/obsfiles 🐧 /opt/obsfiles
Take note of the exact filename of the dashboard file you downloaded in #3 above (for example, theGateway15.html) — you’ll need it again in Step 8.
STEP 7
Import/Select OBS Scene Collection
The Scene Collection contains all of the Layouts and Slots theGateway uses to display SDR Sources.
- 🪟 Windows / 🐧 Linux: click File in the top OBS menu. 🍎 Mac: click OBS Studio in the top menu bar
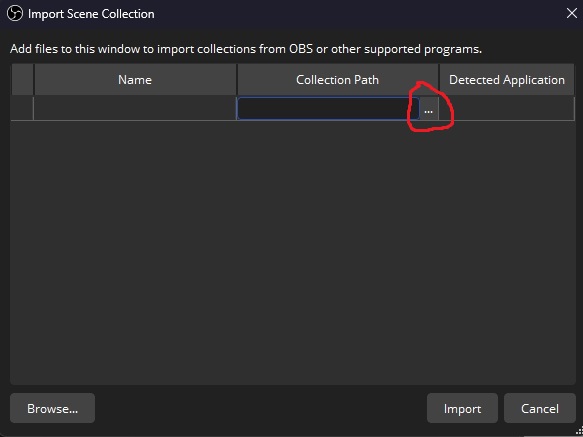
- Go to Scene Collection → Import
- In the window that appears, click the … button next to Collection Path
- Browse to your obsfiles folder (🪟 C:\obsfiles · 🍎 /Users/Shared/obsfiles · 🐧 /opt/obsfiles) and select the Scene Collection .JSON file you downloaded
- Click Import
- Once imported, open Scene Collection menu again and select from the list to make it your active collection
🍎 Mac / 🐧 Linux — one extra check
After importing, find the source named RadioAudio in your Audio Mixer (bottom of the OBS window), click the gear icon next to it, and choose Properties. Pick your actual microphone/radio audio input device from the dropdown — this couldn’t be set in advance because every computer’s audio devices are named differently. Windows users can skip this; it’s already configured.
STEP 8
Add theGateway as OBS Dock
A “Dock” is simply a panel that can live inside the OBS window. This step adds theGateway’s control dashboard as one of those panels, so it’s always available.
- In OBS, click Docks in the top menu
- Select Custom Browser Docks
- Under Dock Name, type: theGateway
- Under URL, type the path to the dashboard file you downloaded in Step 6:
- 🪟 Windows: c://obsfiles/theGatewayXX.html
- 🍎 Mac: file:///Users/Shared/obsfiles/theGatewayXX.html
- 🐧 Linux: file:///opt/obsfiles/theGatewayXX.html
(Replace “XX” with whatever version number your downloaded file from Step 6 actually has.)
- Click Apply, then Close
The file name in the URL must match your downloaded file’s name exactly, including the version number. If theGateway doesn’t appear or won’t load in the next step, this is the first thing to check.
STEP 9
Launch theGateway and Connect
Everything is now installed. Here’s how to bring it to life:
- In OBS, go to Docks in the top menu — you’ll now see theGateway listed
- Click it to open theGateway’s dashboard as a panel inside OBS. If it does not appear, re-visit Step 8
- Look at the bottom of the theGateway panel. If everything is connected correctly, you’ll see ● CONNECTED in green
If it says DISCONNECTED instead:
- Make sure OBS itself is open and running (theGateway needs OBS running to connect)
- Revisit Step 2 and confirm the Server Port is set to 4455 and Enable Authentication is unchecked
- Close and reopen the theGateway dock